Wooden quadcopter body

>> Wednesday, February 16, 2011

brings back memories of balsa wood gliders
[Greasetattoo] shares the process of building his wooden quadcopter body that won 2nd place in the Minnesota state fair.  His plans were purchased as a kit back in 1999, but he never got around to actually building them. The original plans called for a foam board body, but he felt that a wooden piece of art would be much nicer. This build isn’t focusing on the electronics, they’re just a kit from Mikrokopter. Instead, it is a log of the entire process of making the beautiful wooden body. He really put some nice detail in there from the layered and nicely finished dome to the little oak sleeves for his motors. Great job [Greasetattoo].

Read more...

Super Brite LED Sneakers

>> Tuesday, February 15, 2011


[i am jen] needed to spice up some shoes, and what better way to do that, than to spike them out in LEDs controlled by a micro controller. In order to make the LED strips, an inventive use of Velcro is applied. One half of the strip is secured to the shoes, while the other half gets a sheet of electrical tape on the sticky side. Small holes are then punched though the strip and the LEDs are then soldered.
Electronicswise the shoes are using a pair of 6 volt batteries, with no readily available holder, a “AA” battery holder is chopped to size and glued back together. Patterns are controlled by a Really Bare Bones Board Arduino, (which, even if your not an Arduino fan, is a cool little AVR breakout board for 28 pin chips) and cycles through different patterns using magnets and reed switches on the inside edges of the shoes.
Even if its not your style, check it out for a few good hacks and join us after the break for a short video.

Read more...

Screamer doll prank toy

screamer_doll
While it is only the middle of February, it might be a good time to start thinking about your plans for April Fool’s day. [Dino's] Screamer Doll is his submission to the upcoming 555 Contest.  This fun little circuit can be used to easily annoy your cube or house mates and is perfect for all of the April Fool’s day pranksters out there. He fit all the components into a small plastic toy, replacing the eyes and mouth of the doll with three photo cells, and swapping the nose out for a bright LED. When light hits the photo cells, a loud high-pitched squeal is emitted, and the LED blinks furiously until the light source is removed. Shielding the device from light will cause both the sound and LED to slow down, but the brightness of the LED ensures that the toy still makes noise when covered.
It would be great to see a version of this project that is completely silent in the dark, allowing it to be hidden at night, greeting its victims come morning.
If you want to see video of the device in action, read on – just be sure to keep your speaker volume at a reasonable level!

Read more...

I can't sign in. What should I do?

>> Friday, February 11, 2011

The first thing you should do is go to http://blogger.com/forgot.g, where you'll find tools that should help you sign in. If you're still unable to sign in after this process, please see the alternate solutions below.
Select your problem from the list below:

Password recovery email not received
  • Check your Spam/Junk/Bulk Mail folder to see if the message was misrouted.
  • Try entering several email addresses in case you didn't use your primary one for Blogger.
  • Try recovering your username instead of your password. You may have misremembered your username and could be sending password recovery emails to another user. (We recommend trying this, even if you think you're sure of your username.)
Forgotten email address
If you can't remember which email address you used when you created your account, start by making a list of all your addresses (including old ones that you might have used when you signed up). Then, enter each address, one by one, into the username recovery form. Most will give you an error, until you enter the one that you actually used, in which case you'll see a message indicating that your username has been sent.
Continual prompting to sign in, or 'Session Expired' messages
If you repeatedly get bounced back to the sign-in screen, with no message about an incorrect username or password, this is caused by your browser not retaining your sign-in information correctly. You may also see 'Session Expired' messages in these cases. To fix this you need to troubleshoot your browser, so try the following:
Note that if you have a firewall, you should check its cookie settings as well and make sure it will allow Blogger's cookies to be set. Check the manual or documentation for the firewall for information on this.
Last resorts
  • Restart your computer.
  • Try a different computer.
  • Try a different Internet connection.
  • Take a deep breath -- the world isn't ending -- write us for help. Be sure to give us as much information as you can about your account and the problems you're experiencing.

Cookies
Your browser needs to accept cookies. Many browsers have a simple choice in the Options or Preferences that will let you choose to either accept or reject cookies. In Internet Explorer, it is a little different. If you go to Tools > Internet Options >, you'll find a sliding scale. If it is set to High or Block All, Blogger won't be able to set the cookies it needs to signyou in. A setting of Medium-High or lower will work. This is what it looks like:
Internet Explorer: privacy settings JavaScript
Blogger also needs to have JavaScript enabled in order to function properly. Again, many programs have this as a simple option in the Preferences, but it's a bit trickier in Internet Explorer. Go to Tools > Internet Options > Security and click the Custom Level button. Scroll down until you see the Scripting section and make sure that 'Active scripting' is enabled. Then click OK to all the windows until you're back at your browser.
Internet Explorer: security settings

Read more...

Creating 'After the jump' summaries

After the Jump is a feature which lets you create expandable post summaries in your blog posts, so longer posts appear as an intro with a link to Read More
Creating jump breaks in your blog posts can be easily done right from the post editor, without the need for any HTML changes. First, decide where in the post you want to create the jump break, and place your cursor in that position:


Once your mouse cursor is placed at the jump point, simply click the Insert Jump Break toolbar icon:


Clicking the icon will insert a grey bar at the cursor point, illustrating where in the post your break will appear. The bar can be dragged though, so you can always re-position it after insertion.

If you don't use the new post editor, you can still insert a jump break in Edit HTML mode by adding where you want to position the jump break.


Once you are set on the jump break's location within the post, you are ready to publish your post. After publishing, you will notice that the Read More link is placed where you set the jump break:


Clicking on the Read More link will then display the full text of the post:


If you feel like changing the Read More text to your own custom phrase, you can easily do this from the Layout | Page Elements tab. Click Edit on the Blog Post widget, and then change the Post page link text to whatever you'd like.


One more note, the Jump Break feature does not change how your post appears in your feed. You can configure post feed options by going to Settings | Basic | Site Feed, and editing Allow Blog Feeds.

Note:For those using a customized third-party template, you will have to add a snippet of code to make Jump Breaks work.
To do this, access your blog's Layout | Edit HTML tab, and first backup your template by clicking the Download Full Template link at the top of the page. This will download an XML version of your template which you can upload later at any time if you need to.
After backing up your template, then click the Expand Widget Templates checkbox, and scan your HTML for the following snippet:

<data:post.body/>
Once you've located that code, paste the following snippet directly below it:

<b:if cond='data:post.hasJumpLink'>
<div class='jump-link'>
<a expr:href='data:post.url + "#more"'><data:post.jumpText/></a>
</div>
</b:if >


After you've pasted in the code, click Save and then you're done!

Read more...

How to submit a gadget to Blogger

How to build your own Blogger gadget
At Google, gadgets are simple HTML and JavaScript applications that can be embedded in web pages and other apps, including Blogger.
Every Blogger blog is a gadget container. Moreover, every blog is an OpenSocial gadget container powered by Friend Connect. That means as a gadget developer you can leverage social APIs to build engaging tools for bloggers and their audience.
When you build a gadget for Blogger, it becomes available to millions of active bloggers. Just submit your gadget to us, and it will immediately surface in Blogger.com where users can easily browse, configure, and add your gadget to their blog's sidebar.
So now that you know Blogger is a great distribution platform for your gadget, what are you waiting for? Get started building gadgets for Blogger now! Find out how to build your own Blogger gadget here!
Once you've throughougly tested your gadget, and followed Blogger's Best UI Practices, you're ready to submit your gadget.

Read more...

Can I edit the HTML of my blog's layout?

Yes, just go to the >Layout tab and click the Edit HTML sub-tab. Keep in mind that Blogger's Layouts feature makes it easy for anyone to customize the look of their blog with little or no technical knowledge.
The first thing on the Edit HTML page is an option to download a copy of your template to a text file on your hard drive. We highly recommend doing this if you've made any interesting customizations to your design at all. Then, if you make a mistake editing your template, or if you just don't like the way it comes out, you can revert easily by uploading the same file again.
Next comes the actual code for your template. You'll notice it looks somewhat like regular HTML and CSS, but also includes lots of custom tags that make it compatible with our drag-and-drop layout editor, and with the font and color picker. If you want to make extensive changes to your code, you'll want to read up on these tags first:

You'll also see an option to 'Expand Widget Templates.' By default, each page element is shown in the code as a one-line placeholder, whose options can be set in the graphical interface on the Page Elements tab. Turning this option on will show the complete data and template for each element. The code is simpler the first way, but you have more control the second way, so use whichever option you prefer. Learn more by reading this help article:
Below the code, you'll see three buttons for Clear Edits, Preview, and Save Template, which do what you'd expect them to.
There are also two links referring to your 'classic template.' If you converted your blog from the older style of Blogger templates to the new Layouts version, then your classic template is the last template you used in the old system, with all your customizations. If your blog was created on the new system and has always used Layouts, then your classic template is a default, classic version of the original design you chose when you created the blog, without any customizations. The View link will show you the code, in case you just want to check up on something, or copy a piece of it for your new design. The Revert link will erase all the customizations you made in the Layouts feature and set your blog to use the old-style Blogger template again. Note that you won't be able to use the graphical Layouts interface in this mode (though you can convert back to Layouts again later).

Read more...

Who are Followers?

Followers are people who are interested in your blog. They became a follower of your blog by either following your blog via your Following gadget or they followed your blog from their Reading List.
You can find out more about your followers by clicking on their image. You will then be able to Block the user and see the user's activities, sites they've joined and friends.

Read more...

Privacy and permissions

By default, your blog is completely public, and can be read by anyone on the internet. However, if you want to keep it private, you can do that, too. You cna change these settings on the Settings | Permissions tab.

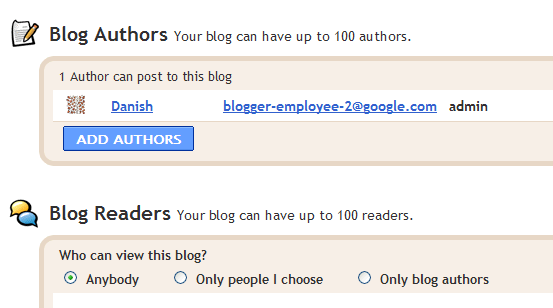
  1. Under the 'Blog Readers' heading, you'll probably see 'Anybody' selected as the default. When you change this to 'Only readers I choose,' you'll get an Add Readers button.
  2. Click the Add Readers button and then enter the email address of a person to whom you'd like to grant access to your blog. To add multiple people, separate their addresses with commas.
  3. For each address entered, the Google Account associated with that address will be given access to view your blog. If an address is not associated with an account, that person will receive an invitation email with a link allowing them do one of three things:
  • Sign in to an existing account.
  • Create a new account.
  • View your blog as a guest (no account required).
setting Blogger permissions

Read more...

Follow other blogs

With the Blogger Following feature you can keep track of the blogs you follow via your Reading List on the Blogger dashboard. There are several ways to become a follower of a blog. One of the easiest ways is to visit a blog that has added the 'Following' widget, ad then follow these steps:

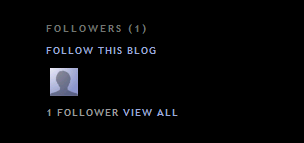
  1. Click the FOLLOW THIS BLOG link under the 'Followers' widget. following blogs
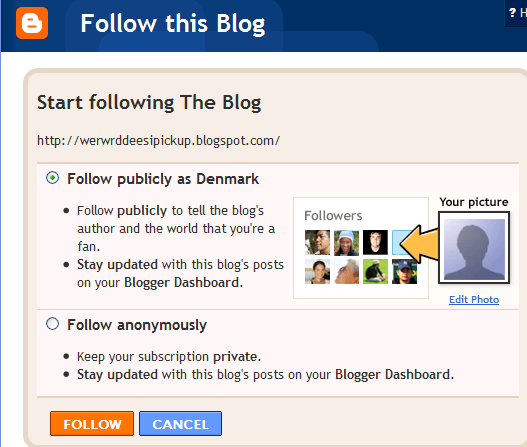
  2. You'll then see a pop-up window with the options to either follow publicly or anonymously. settings for following blogs
  3. Select how you'd like to follow the blog, then click the orange FOLLOW button. You're now a follower of the blog! If you chose to follow the blog publicly, your profile picture will be displayed on the blog with a link to your Blogger profile.
  4. When you become a follower of a blog, the blog will also be added to your Reading List on your Blogger dashboard. Additionally, you can become a follower of any blog or URL (even if the blog doesn't have the 'Followers' widget) by adding the blog to your Reading List on the dashboard.

Read more...

Customizing your layout

Your template is a fun way to customize your blog. When creating a new blog, you're first asked to choose a default template, this is the basic design of your blog. You can choose from customize your blog's design using our intuitive drag-and-drop interface. You can also add powerful gadgets such as slideshows, user polls, or even AdSense ads. Changing the fonts and colors on your blog is easy too. If you want more precise control over your blog's layout, you can also use the Edit HTML feature. To edit your blog's layout, follow these steps:

  1. Click the Layout link from your dashboard below the blog you would like to customize.
  2. From the Page Elements sub-tab, click Edit to edit existing gadgets, or Add a Gadget to add new ones.
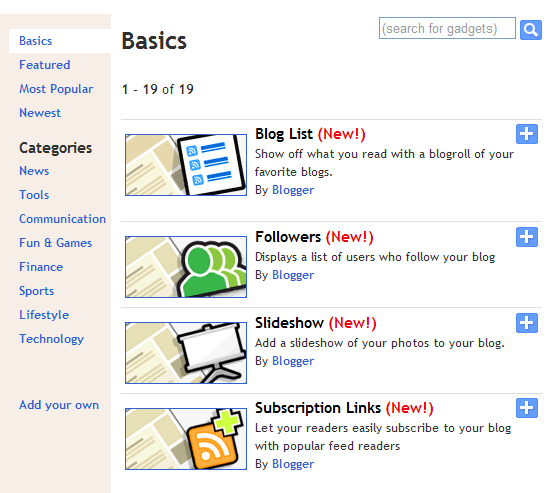
  3. To add a new gadget after you've clicked Add a Gadget, simply click the plus sign next to your desired gadget. You can choose from gadgets by category, or search for a specific gadget in the top right of the pop-up window. gadget list
  4. Once you've added the necessary information to your selected gadget, click SAVE. Your layout changes will appear instantly. saving chnages to gadgets

Read more...

Add an image

You can add an image from your computer or the Web to your blog. Click the image icon in the post editor toolbar. A window appears prompting you to browse for an image file on your computer, or enter the URL of an image on the Web.
Once you've selected your image, you can then choose a layout to determine how your image will appear in your post:

  • The 'Left', 'Center', and 'Right' options allow you to customize the way your blog text will flow around your image.
  • The 'Image size' options will determine how large the image will appear within your post.
Click UPLOAD IMAGES to add your image, and then click DONE when the notification window appears telling you that 'Your image has been added.' Blogger will then return you to the post editor, where you'll see your image ready to be published to your blog.
You can also publish images to your blog using your mobile device, Google's free photo software Picasa, or a third-party service like flickr. Learn more

Read more...

Add a video

To add a video to your blog post, click the film strip icon in the post editor toolbar above where you compose your blog text. A window appears prompting you to 'Add a video to your blog post.'
Click Browse to select the video file from your computer that you'd like to upload. Note that Blogger accepts AVI, MPEG, QuickTime, Real and Windows Media files and that your video must be less than 100MB in size.
Before uploading your video, add a title in the 'Video Title' box and agree to the Terms and Conditions (you'll only have to do this the first time that you upload a video with Blogger). Then click UPLOAD VIDEO.
While your video uploads, you'll see a placeholder in the post editor showing where your video will appear. You'll also see a status message below the post editor letting you know that your upload is in progress. Depending on the size of your video, this usually takes about five minutes. When it is complete, your video will appear in the post editor.
Want to see this in action? Click the link to watch a video on how to add a video to your blog post:
Adding a video to your post

Read more...

Getting started with Blogger


Blogger offers an easy way to collaborate, discuss, or share your thoughts with others. This guide can help you familiarize yourself with the main features of Blogger and get started writing your own blog.
To start using Blogger, simply sign in with your Google Account. (If you use Gmail, Google Groups, or orkut, you already have an account.) If you don't have a Google Account yet, you can create one now.

Create a blog

To get started with Blogger, visit the Blogger homepage, enter your username and password, and click Sign in. Enter a display name and accept Blogger's Terms of Service. Then click the Create a Blog link and get started!
Pick a name and address (URL) for your blog. Then, choose your favorite template (this is how your blog will look when you publish it). Now get greative, add information to your personal profile, and customize how your blog looks, if you feel up to it. Start blogging now!

Read more...

Write your post

Once you've signed in to Blogger, you'll see your dashboard with your list of blogs. Here's what you need to do:

  1. Click the NEW POST button and enter anything you want to share with the world.
  2. Next, you'll see the Create New Post page. Start by giving your post a title (optional), then enter the post itself:
    Creating a new post
  3. When you're done, click the Preview link to make sure it's ready to go:
    Previewing a post
  4. Once you're satisfied with your post, click the Publish button. This will publish your new post.

Read more...

Private vs. public following

Following Publicly: When you follow a blog publicly, your profile image and a link to your Blogger profile will appear in the blog's Followers widget. (Note: the blog owner may not have a Followers widget, but may add one in the future. If they add one in the future, your picture and link to your profile will appear there. Also, even if the blog owner doesn't have a widget, they can still see who their followers are in their Dashboard.) This site will also show on your Google Friend Connect profile for all the sites you've joined using Friend Connect. You will also be subscribed to updates for this blog which will appear in your Reading List on your Dashboard. Additionally, following a blog will create a subscription to the blog in your Google Reader account.
Following Privately: When you follow a blog privately, your profile image and link to your profile will NOT be displayed in the blog's Followers widget and the blog will not be displayed in your Friend Connect profile on other sites. However, you will be subscribed to updates for this blog which will appear in your Reading List on your Dashboard. Additionally, following a blog privately will create a subscription to the blog in your Google Reader account.

Read more...

How do I edit my profile?

To change your profile information, click the Edit Profile link on your Dashboard:
Edit Profile Add or edit as much information as you like. Once you're finished, click the Save Profile button to save your changes.
Save Profile Note: If you want to change your Blogger password, please follow these instructions.

Read more...

How do I delete a post?

To delete a specific post, first go to your blog via the Dashboard, then locate the post you'd like deleted, and click the Delete link all the way to the right:
Delete a post You will be asked to confirm the deletion. Click on the 'Delete It' button. You will then be brought back to your 'Edit Posts' view.

Read more...

Can I use keyboard shortcuts while posting?

Blogger has several keyboard shortcuts you can use while editing posts. They definitely work in Internet Explorer 5.5+/Windows and the Mozilla family (1.6+ and Firefox 0.9+), and might work in other browsers. Here they are:

  • control + b = Bold
  • control + i = Italic
  • control + l = Blockquote (when in HTML-mode only)
  • control + z = Undo
  • control + y = Redo
  • control + shift + a = Link
  • control + shift + p = Preview
  • control + d = Save as Draft
  • control + p = Publish Post
  • control + s = Autosave and keep editing
  • control + g = Indic transliteration

Read more...

All about the Blogger 'Monetize' tab

The Monetize tab in Blogger makes it easy to enable AdSense ads on your blog. Once enabled, Blogger will retrieve your AdSense earnings data directly from AdSense so you do not need to go to AdSense to get basic earnings information.

AdSense Reports

Once you start generating AdSense impressions, you will begin earning money when people click on ads that show on your site.
The earnings report (visible when you click on the Monetize link from your Dashboard, or the Monetize tab when viewing your blog while logged into Blogger) includes a drop-down bar with Today, Yesterday, Last 7 Days, This Month, Last Month, and All time.
Selecting an option will retrieve the relevant report directly from AdSense.

All time

If you are already an AdSense user, you will notice that Blogger created a new channel (with the URL of your blog) in your account. If you have had AdSense ads on your blog before using Blogger’s AdSense integration to insert ads into your blog, it is important to note that All time will retrieve data only from the time you connected Blogger to your AdSense account.
This in no way affects your overall AdSense reporting, available directly from AdSense.

Terminology

The AdSense report visible from the Monetize tab contains basic information about how many ads have run on your blog, how many clicks were generated, and how much revenue you have earned. Each term in the report is defined below:

  • Page impression: A page impression is generated every time a user views a page displaying Google ads. We will count one page impression regardless of the number of ads displayed on that page. For example, if you have a page displaying three ad units and it is viewed twice, you will generate two page impressions and six ad unit impressions.

  • Clicks:# The number of times an ad was clicked on in the given reporting period.

  • Page CTR (Clickthrough Rate): The number of ad clicks divided by the number of impressions for the page of ads that appears when a link unit is clicked.

  • Page eCPM (Effective Cost Per Thousand Impressions): Calculated by dividing earnings by number of page impressions and multiplying. This makes it easier to compare multiple sites to see which are performing better.

  • Earnings: Total revenue earned to date. More detail about earnings is available in the AdSense Help Center.

  • Read more...

    How do I add the Following gadget to my blog?

    Do you want to know who regularly reads your blog and develop a public fan base for your blog? Well now you can do that and more with the Blogger Following feature! In Blogger, users can publicly Follow any URL to tell the blog's author and the world they are a fan. With the Followers gadget, you can display your blog's Followers on your blog to show your blog's popularity and encourage more readers to stay updated with your posts.

    How to add the Following widget to your blog

    It's really easy to add the Following widget to your blog. First go to the Layout | Page Elements tab for your blog:
    Click the "Add a Gadget" link that appears in the sidebar of your layout. You'll then see a popup window with all the different types of Gadgets you can add to your blog. (The Following widget will initially be experimental, so some users may not be able to add widget.) Look for the one called "Followers" and click on the blue "+" icon:
    You can then enter your desired title for your Following widget. Once you have chosen a title, click the orange "Save" button. You have now added the following widget to your blog!
    Readers can now go your blog and become a follower! Tell all your friends and grow your fan base. Once your readers become followers of your blog, their profile picture will be displayed in your Following widget.
    A running count of your followers will be displayed next to the blog name on your dashboard.
    If you click the "Followers" link you will see a list of all your followers.

    How to grow your audience with Following

    The Followers widget is a great tool to help you grow your blog's audience. Readers often visit a blog and enjoy it but fail to return. With the followers widget you can get all readers to return and become a fan. We highly recommend that you write a post about your followers widget and encourage all readers to become a follower. Additionally you should put your followers widget at the top of your sidebar so more readers will notice it. Many readers ignore sidebar items so by writing a post about your followers widget and moving the widget to the top of your sidebar, you will inevitably grow your audience.

    What is Blocking?

    You have the option to block any of your followers by clicking the blue "Block" button. This will remove the user from your Following widget so their image will no longer appear on your blog. However, if your blog is public the user can still subscribe to your blog, read your posts and comment.

    Read more...

    How to put Google Affiliate Network links in your blog's sidebar

    If you're new to Google Affiliate Network and not too familiar with making modifications to your blog's template, you can follow these instructions for placing Google Affiliate Network links in your blog's sidebar (using the Minima template as an example).
    Once you sign up and are approved for a Google Affiliate Network account, you can sign in here to view your account. Once you're signed in, click the Links tab near the top of the page. Select which advertiser's links you want to work with, and then follow these steps:

    1. Choose your links - In the 'Links' section of your profile, select the advertiser whose links you want to use. Click Get Links in the Action drop down menu next to the advertiser's name. Click either the Text Links or the Image Links tab to view your options in each category. To fit ads in your sidebar, it's best to choose one of the following dimensions for an image link:
      Button (125x125) 
      Skyscraper (120x600)
      Wide Skyscraper (160 x 600)
      Vertical Banner (120 x 240)
      Small Rectangle (180x150)
    2. Copy your Affiliate link HTML - Just beneath your desired link, click Get HTML. A box with code in it will appear. Highlight all of that code, then copy and paste it into Notepad, Text Edit, or a similar program.
    3. Sign in to Blogger - Choose the blog you want to put ads on and click the Template tab.
    4. Caution - Copy your entire Blogger template and save it in Notepad or Text Edit just in case.
    5. Find the place in your template that says:
      <!-- Begin #sidebar -->
      <div id="sidebar"><div id="sidebar2">
    6. Paste the Affiliate link HTML you saved earlier right beneath that place in the template:
      <!-- Begin #sidebar -->
      <div id="sidebar"><div id="sidebar2">
      PUT YOUR AFFILIATE LINK HTML HERE!
    7. Save your template changes and republish your blog.

    Read more...

    How to put AdSense and Google Affiliate Network in your blog's sidebar

    Note: This article assumes you are using a classic template. For Layouts-enabled blogs, you can simply add a new AdSense page element to your sidebar, or drag an existing element to the desired location.
    If you're new to AdSense and not too familiar with making modifications to your blog's template, you can follow these instructions for placing AdSense code in your blog's sidebar (using the Minima template as an example).
    Assuming you have already signed up and been approved for a Google AdSense account, you should be able to log in here. Once you're signed in, click the AdSense Settings tab near the top of the page. To cut right to the chase, focus on these steps:

    1. Choose Your Ad Layout - To fit ads in your sidebar, it's best to choose one of the following ad layouts.
      Button (125x125)
      Skyscraper (120x600)
      Wide Skyscraper (160 x 600)
      Vertical Banner (120 x 240)
      Small Rectangle (180x150)
    2. Choose a color palette - They are very cleverly named but it's really just a matter of your preference.
    3. Copy your AdSense code - At the bottom of the page, there's a box with code in it. Highlight all of that code and copy it.
    4. Paste the code somewhere - Notepad or Text Edit or something like that is a good place for now.
    5. Go to Blogger.com and sign in - Choose the blog you want to put ads on and click the template tab.
    6. This is less of a step and more of a precaution - Copy your entire Blogger template and save it in Notepad or Text Edit just in case.
    7. Find the place in your template that says this; you might have to scroll down pretty far:
      <!-- Begin #sidebar -->
      <div id="sidebar"><div id="sidebar2">
    8. Paste the AdSense code you saved earlier right after that part.
      <!-- Begin #sidebar -->
      <div id="sidebar"><div id="sidebar2">
      PUT YOUR ADSENSE CODE HERE!
    9. Save your template changes and republish your blog.

    Read more...

    Welcome to Google Buzz

    To get acquainted with Buzz, check out the video.
    In Buzz, you'll see posts from people you follow. You can search for people to follow in the next step. The first time you post in Buzz you'll create a profile which includes the list of people you follow and people following you -- you can choose not to display these lists if you'd like. Learn more about Buzz

    Read more...

    Customize Gmail with colors and themes

    To spice up your inbox with colors and themes, check out the Themes tab under Settings.


    Customize Gmail »


    Enjoy!
    - The Gmail Team
    Themes thumbnails Please note that Themes are not available if you're using Internet Explorer 6.0. To take advantage of the latest Gmail features, please upgrade to a fully supported browser.

    Read more...

    Import your contacts and old email

    You can import your contacts and mail from Yahoo!, Hotmail, AOL, and many other web mail or POP accounts. If you want, we'll even keep importing your mail for the next 30 days.


    Import contacts and mail »


    We know it can be a pain to switch email accounts, and we hope this makes the transition to Gmail a bit easier.

    Read more...

    Get Gmail on your mobile phone

    fromGmail Team <mail-noreply@google.com>
    tobejo bejan <bejoturbejan@gmail.com>
    dateThu, Feb 10, 2011 at 12:19 PM
    subjectGet Gmail on your mobile phone
    mailed-bygoogle.com
    Images from this sender are always displayed. Don't display from now on.
    hide details Feb 10 (2 days ago)

    Access Gmail on your mobile phone
    The days of needing your computer to get to your inbox are long gone. You can now use Gmail on your mobile phone to access your email from anywhere.

    Read more...

    Mercedes-Benz unveils SLS AMG E-Cell Electric Sports Car at the Detroit Auto Show

    >> Thursday, February 3, 2011


    Read more...

    Artist Cal Lane Transforms Industrial Objects into Intricate Lace Sculptures


    Read more...

    Keepon finally gets a cheaper version


    Keepon, the adorable bot meant to help autistic kids with its jovial dance moves, seems to finally be getting a cheaper version. The original cost $30,000 and did a lot more than dance. Actually, we got to play with it a little bit at CES a couple years ago. The commercial version most likely won’t have facial recognition or any of the other fancy features of the first one, but we hope it can dance well.  We’ve actually seen a couple home made versions and we’re hoping that the new one has some major hacking potential. The temptation to have one of these cute little bots around is made even stronger when you see that some of the money is going back into autism research.

    Read more...

    Green Overdrive Video: The RAV4 EV (Via Tesla, Toyota)!

    electric rav4, toyota, tesla, gigaom, green overdrive, ev rav4 test drive, green car, electric car, alternative transportation, green transportation, sustainable design, green design
    In one of the most interesting electric vehicle partnerships of 2010, Tesla and Toyota announced last year that they would jointly build an electric RAV4, combining Toyota’s SUV with Tesla’s battery and EV tech. For this week’s episode of GigaOM TV’s Green Overdrive Show, we grab some time with the RAV4 EV’s chief engineer, learn about the partner’s future plans and check out the inaugural car!

    Read more...

    Disco Death Ray


    Wielding the power to melt glass or instantly ignite most day to day materials can be intoxicating pretty fun. With a little math, a lot of patience, and 5,800  1cm pieces of mirror, this build requires welding glasses just to look at the 1-2cm focal point. With an idea rumored to date back to Archimedes, this more portable parabolic project is perfect for your home burning needs. Unfortunately, this setup seems to have burnt itself to death at some point, though that makes room for version two, which will reportedly bump the mirror count to 32,000 or so.
    There are plenty of other ways to make a death ray out there as well, including using lasers or lenses. Think you have a better tool of destruction? Be sure to tell us about it

    Read more...

    Nook Color gets honeycomb


    [Deeper-blue] has released all the files necessary to get Android honeycomb working on your nook color. We had a chance to play with the nook color for a bit, but ours was only on Android version 2.1. It seems like they’ve come a long way with the capabilities of this simple e-reader since then.  While he’s built out the majority of the features, it is still lacking some fundamentals, like sound. As you can see in the video after the break, the scrolling is a tiny bit choppy but the applications themselves see to be fairly snappy. We can’t wait to see how this works after a little improvement.

    Read more...

    Japanese Pals Recycle Old Truck into Transforming Two-Story Mobile Home


    Read more...

    Fermentation temperature control


    [Eric Friedrich] needed to keep the wort warm enough for yeast to ferment it into beer. To solve the problem he built his own fermentation temperature controler using a microprocessor to turn some heating tape on and off. You can see the heating element embracing that diminutive fermentation bucket in the picture above. This was originally meant for keeping reptile cages warm. It costs less than similar products meant just for brewing and works well for [Eric]. A DS1820 temperature sensor gives feedback to an ATmega168 which then uses a relay to switch the heat on and off. The target temperature can be changed using a potentiometer on the board, with the setting displayed on a character LCD screen on the project enclosure.

    Read more...

    Rotary dial authenticates sudo commands


    [W1ndman] won’t win any security awards for this build, but it’s an interesting idea. On many Linux-based systems commands can be run with administrator privileges by prefacing them with the keyword ‘sudo’. Normally you’d be asked for a password but [W1ndman] used the Pluggable Authentication Modules (PAM) to authenticate via his own shell script. That script checks a code from this rotary dial for authentication. An Arduino takes care of listening for each digit that is entered and then sends the code via USB for comparison with a stored file. We’re not sure if that stored code is in a plain file or is otherwise protected, but at the very least this prevents you from using ‘sudo’ willy-nilly.

    Read more...

    Company Turns LED Ceiling Lights into Wireless Internet Source


    lvx systems, internet access ceiling lights, wi-fi lights, internet access lights, office lights internet, led lighting, leds, green lighting, lvx systems, green design
    You could soon be getting your internet at the speed of light! Well, not literally, but one company is divising a system that uses LED ceiling lights to transmit data (namely the internet) to computers equipped with special sensors. What this means is that light waves could potentially replace radio waves as  a method of transmitting data, since lights can ‘flick’ data faster than the eye can see. The company, LVX Systems, has already implemented the technology at several city offices in St. Cloud, Minnesota.

    Read more...

    Water-dosing coffee maker augmentation


    [Arthur Benemann] has the worst part of making coffee licked. His add-on for a drip coffee maker fills the water to the proper levels for you, saving the drudgery of rinsing out the carafe, carefully filling it to the appropriate level, then pouring it into the machine without getting everything wet. This isn’t limited to a full pot, but is user selectable by the cup based on how many times in a row you hit that red button. One LED gives feedback on the selected mode, then the device uses a washing machine water valve to turn on the tap for the appropriate amount of time. We’re a little bit leery of connecting homebrew hardware to the water pipes in our house. Make sure you’ve done a good job of debugging so that an infinite loop doesn’t flood you out.

    Read more...

    Shiny acrylic MAME box


    This nice table-top MAME arcade features a two-toned acrylic case. [Fabricio] spent about 50-60 hours designing the 29 parts that make up the enclosure. Originally the sides were meant to be orange but one design flaw meant he had to have them recut and only had enough black stock for the job. But we like it this way. The screen is just over ten inches and inside you’ll find a mini-ITX motherboard with a gig of ram and a solid state drive. The seven page build log features some bending, glue, screwing, and wiring that really show off the depth of the project.
    This results a very modern look but if you like your retro gaming to appear vintage we recommend this cocktail cabinet.

    Read more...

    Sliced Stable: Open-Air Kitchen Connects With the Land


    sliced Stable, Overtreders W, green pavillion, post and beam, art pavilion, Netherlands art, green architecture, sustainable design
    This Sliced Stable in the Netherlands is a little piece of community space set on a farm that is destined to become forested land again. Part of an art experience by Dutch design studio Overtreders W, the project is a vision for a community gathering place with an agricultural bent. Spotted over at Designboom, the simple, wistful structure is part of an exhibit called The Woods That See and Hear, and it consists of a kitchen and tables with a look-out seat rising above the din.

    Read more...

    Building infra red light sources with regular lights


    [Oneironaut] sent us another IR hack. This time it is a writeup on the best ways to create IR light sources from regular lights. Since normal flashlight bulbs emit a broad enough spectrum to include visible light and IR light, this basically comes down to filtering. [Oneironaut] explores different light sources and different materials in depth, along with great pictures to show his results. This is a great resource if you’re needing to do some night vision for cheap.

    Read more...

    Automating automatic racing


    Hackaday forum user [Nikescar] upgraded his XBox360 hard drive. During this upgrade, his Forza 3 game save was lost. He had accumulated millions of in-game dollars and really wanted to get back to where he was. We’re not familiar with the game, but he says that one easy way to make some money is to allow the AI to run races for you while you do other things. Unfortunately, this requries coming back to the system and starting a new race every hour or so. Luckily, [Nikescar] had an arduino lying around doing nothing, so he patched it into the controller and had it carry out a the correct button press sequence on a schedule.  Now his virtual driver makes virtual money while his virtual-person keeps it going. His real person sleeps.

    Read more...

      © Free Blogger Templates Skyblue by Ourblogtemplates.com 2008

    Back to TOP