Showing posts with label blogger. Show all posts

I can't sign in. What should I do?

>> Friday, February 11, 2011

The first thing you should do is go to http://blogger.com/forgot.g, where you'll find tools that should help you sign in. If you're still unable to sign in after this process, please see the alternate solutions below.
Select your problem from the list below:

Password recovery email not received
  • Check your Spam/Junk/Bulk Mail folder to see if the message was misrouted.
  • Try entering several email addresses in case you didn't use your primary one for Blogger.
  • Try recovering your username instead of your password. You may have misremembered your username and could be sending password recovery emails to another user. (We recommend trying this, even if you think you're sure of your username.)
Forgotten email address
If you can't remember which email address you used when you created your account, start by making a list of all your addresses (including old ones that you might have used when you signed up). Then, enter each address, one by one, into the username recovery form. Most will give you an error, until you enter the one that you actually used, in which case you'll see a message indicating that your username has been sent.
Continual prompting to sign in, or 'Session Expired' messages
If you repeatedly get bounced back to the sign-in screen, with no message about an incorrect username or password, this is caused by your browser not retaining your sign-in information correctly. You may also see 'Session Expired' messages in these cases. To fix this you need to troubleshoot your browser, so try the following:
Note that if you have a firewall, you should check its cookie settings as well and make sure it will allow Blogger's cookies to be set. Check the manual or documentation for the firewall for information on this.
Last resorts
  • Restart your computer.
  • Try a different computer.
  • Try a different Internet connection.
  • Take a deep breath -- the world isn't ending -- write us for help. Be sure to give us as much information as you can about your account and the problems you're experiencing.

Cookies
Your browser needs to accept cookies. Many browsers have a simple choice in the Options or Preferences that will let you choose to either accept or reject cookies. In Internet Explorer, it is a little different. If you go to Tools > Internet Options >, you'll find a sliding scale. If it is set to High or Block All, Blogger won't be able to set the cookies it needs to signyou in. A setting of Medium-High or lower will work. This is what it looks like:
Internet Explorer: privacy settings JavaScript
Blogger also needs to have JavaScript enabled in order to function properly. Again, many programs have this as a simple option in the Preferences, but it's a bit trickier in Internet Explorer. Go to Tools > Internet Options > Security and click the Custom Level button. Scroll down until you see the Scripting section and make sure that 'Active scripting' is enabled. Then click OK to all the windows until you're back at your browser.
Internet Explorer: security settings

Read more...

Creating 'After the jump' summaries

After the Jump is a feature which lets you create expandable post summaries in your blog posts, so longer posts appear as an intro with a link to Read More
Creating jump breaks in your blog posts can be easily done right from the post editor, without the need for any HTML changes. First, decide where in the post you want to create the jump break, and place your cursor in that position:


Once your mouse cursor is placed at the jump point, simply click the Insert Jump Break toolbar icon:


Clicking the icon will insert a grey bar at the cursor point, illustrating where in the post your break will appear. The bar can be dragged though, so you can always re-position it after insertion.

If you don't use the new post editor, you can still insert a jump break in Edit HTML mode by adding where you want to position the jump break.


Once you are set on the jump break's location within the post, you are ready to publish your post. After publishing, you will notice that the Read More link is placed where you set the jump break:


Clicking on the Read More link will then display the full text of the post:


If you feel like changing the Read More text to your own custom phrase, you can easily do this from the Layout | Page Elements tab. Click Edit on the Blog Post widget, and then change the Post page link text to whatever you'd like.


One more note, the Jump Break feature does not change how your post appears in your feed. You can configure post feed options by going to Settings | Basic | Site Feed, and editing Allow Blog Feeds.

Note:For those using a customized third-party template, you will have to add a snippet of code to make Jump Breaks work.
To do this, access your blog's Layout | Edit HTML tab, and first backup your template by clicking the Download Full Template link at the top of the page. This will download an XML version of your template which you can upload later at any time if you need to.
After backing up your template, then click the Expand Widget Templates checkbox, and scan your HTML for the following snippet:

<data:post.body/>
Once you've located that code, paste the following snippet directly below it:

<b:if cond='data:post.hasJumpLink'>
<div class='jump-link'>
<a expr:href='data:post.url + "#more"'><data:post.jumpText/></a>
</div>
</b:if >


After you've pasted in the code, click Save and then you're done!

Read more...

How to submit a gadget to Blogger

How to build your own Blogger gadget
At Google, gadgets are simple HTML and JavaScript applications that can be embedded in web pages and other apps, including Blogger.
Every Blogger blog is a gadget container. Moreover, every blog is an OpenSocial gadget container powered by Friend Connect. That means as a gadget developer you can leverage social APIs to build engaging tools for bloggers and their audience.
When you build a gadget for Blogger, it becomes available to millions of active bloggers. Just submit your gadget to us, and it will immediately surface in Blogger.com where users can easily browse, configure, and add your gadget to their blog's sidebar.
So now that you know Blogger is a great distribution platform for your gadget, what are you waiting for? Get started building gadgets for Blogger now! Find out how to build your own Blogger gadget here!
Once you've throughougly tested your gadget, and followed Blogger's Best UI Practices, you're ready to submit your gadget.

Read more...

Can I edit the HTML of my blog's layout?

Yes, just go to the >Layout tab and click the Edit HTML sub-tab. Keep in mind that Blogger's Layouts feature makes it easy for anyone to customize the look of their blog with little or no technical knowledge.
The first thing on the Edit HTML page is an option to download a copy of your template to a text file on your hard drive. We highly recommend doing this if you've made any interesting customizations to your design at all. Then, if you make a mistake editing your template, or if you just don't like the way it comes out, you can revert easily by uploading the same file again.
Next comes the actual code for your template. You'll notice it looks somewhat like regular HTML and CSS, but also includes lots of custom tags that make it compatible with our drag-and-drop layout editor, and with the font and color picker. If you want to make extensive changes to your code, you'll want to read up on these tags first:

You'll also see an option to 'Expand Widget Templates.' By default, each page element is shown in the code as a one-line placeholder, whose options can be set in the graphical interface on the Page Elements tab. Turning this option on will show the complete data and template for each element. The code is simpler the first way, but you have more control the second way, so use whichever option you prefer. Learn more by reading this help article:
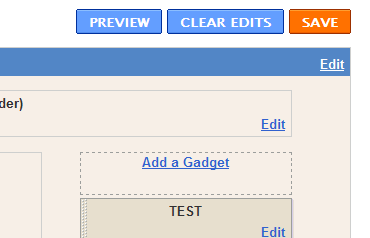
Below the code, you'll see three buttons for Clear Edits, Preview, and Save Template, which do what you'd expect them to.
There are also two links referring to your 'classic template.' If you converted your blog from the older style of Blogger templates to the new Layouts version, then your classic template is the last template you used in the old system, with all your customizations. If your blog was created on the new system and has always used Layouts, then your classic template is a default, classic version of the original design you chose when you created the blog, without any customizations. The View link will show you the code, in case you just want to check up on something, or copy a piece of it for your new design. The Revert link will erase all the customizations you made in the Layouts feature and set your blog to use the old-style Blogger template again. Note that you won't be able to use the graphical Layouts interface in this mode (though you can convert back to Layouts again later).

Read more...

Who are Followers?

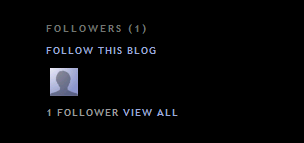
Followers are people who are interested in your blog. They became a follower of your blog by either following your blog via your Following gadget or they followed your blog from their Reading List.
You can find out more about your followers by clicking on their image. You will then be able to Block the user and see the user's activities, sites they've joined and friends.

Read more...

Privacy and permissions

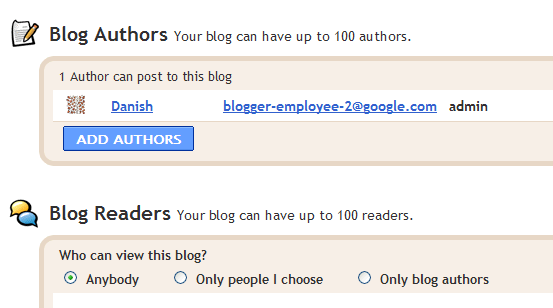
By default, your blog is completely public, and can be read by anyone on the internet. However, if you want to keep it private, you can do that, too. You cna change these settings on the Settings | Permissions tab.

  1. Under the 'Blog Readers' heading, you'll probably see 'Anybody' selected as the default. When you change this to 'Only readers I choose,' you'll get an Add Readers button.
  2. Click the Add Readers button and then enter the email address of a person to whom you'd like to grant access to your blog. To add multiple people, separate their addresses with commas.
  3. For each address entered, the Google Account associated with that address will be given access to view your blog. If an address is not associated with an account, that person will receive an invitation email with a link allowing them do one of three things:
  • Sign in to an existing account.
  • Create a new account.
  • View your blog as a guest (no account required).
setting Blogger permissions

Read more...

Follow other blogs

With the Blogger Following feature you can keep track of the blogs you follow via your Reading List on the Blogger dashboard. There are several ways to become a follower of a blog. One of the easiest ways is to visit a blog that has added the 'Following' widget, ad then follow these steps:

  1. Click the FOLLOW THIS BLOG link under the 'Followers' widget. following blogs
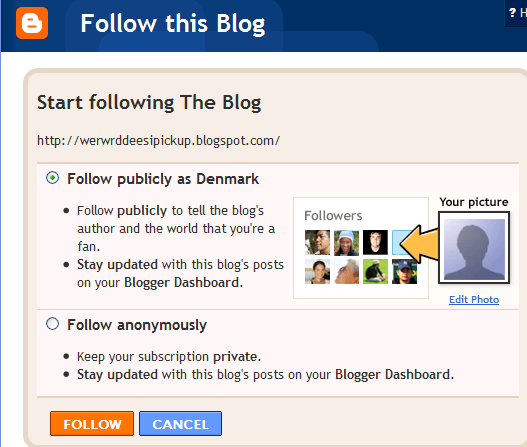
  2. You'll then see a pop-up window with the options to either follow publicly or anonymously. settings for following blogs
  3. Select how you'd like to follow the blog, then click the orange FOLLOW button. You're now a follower of the blog! If you chose to follow the blog publicly, your profile picture will be displayed on the blog with a link to your Blogger profile.
  4. When you become a follower of a blog, the blog will also be added to your Reading List on your Blogger dashboard. Additionally, you can become a follower of any blog or URL (even if the blog doesn't have the 'Followers' widget) by adding the blog to your Reading List on the dashboard.

Read more...

Customizing your layout

Your template is a fun way to customize your blog. When creating a new blog, you're first asked to choose a default template, this is the basic design of your blog. You can choose from customize your blog's design using our intuitive drag-and-drop interface. You can also add powerful gadgets such as slideshows, user polls, or even AdSense ads. Changing the fonts and colors on your blog is easy too. If you want more precise control over your blog's layout, you can also use the Edit HTML feature. To edit your blog's layout, follow these steps:

  1. Click the Layout link from your dashboard below the blog you would like to customize.
  2. From the Page Elements sub-tab, click Edit to edit existing gadgets, or Add a Gadget to add new ones.
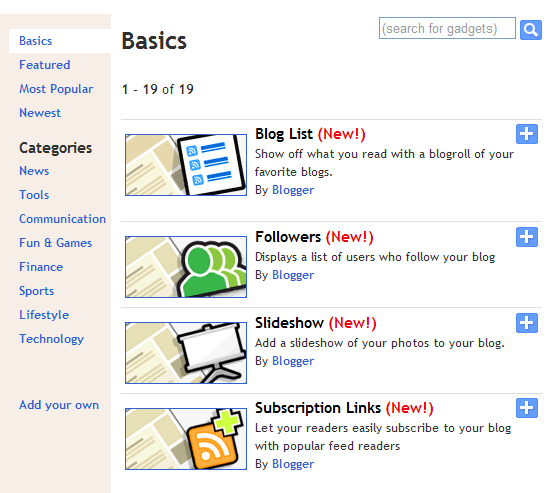
  3. To add a new gadget after you've clicked Add a Gadget, simply click the plus sign next to your desired gadget. You can choose from gadgets by category, or search for a specific gadget in the top right of the pop-up window. gadget list
  4. Once you've added the necessary information to your selected gadget, click SAVE. Your layout changes will appear instantly. saving chnages to gadgets

Read more...

Add an image

You can add an image from your computer or the Web to your blog. Click the image icon in the post editor toolbar. A window appears prompting you to browse for an image file on your computer, or enter the URL of an image on the Web.
Once you've selected your image, you can then choose a layout to determine how your image will appear in your post:

  • The 'Left', 'Center', and 'Right' options allow you to customize the way your blog text will flow around your image.
  • The 'Image size' options will determine how large the image will appear within your post.
Click UPLOAD IMAGES to add your image, and then click DONE when the notification window appears telling you that 'Your image has been added.' Blogger will then return you to the post editor, where you'll see your image ready to be published to your blog.
You can also publish images to your blog using your mobile device, Google's free photo software Picasa, or a third-party service like flickr. Learn more

Read more...

Add a video

To add a video to your blog post, click the film strip icon in the post editor toolbar above where you compose your blog text. A window appears prompting you to 'Add a video to your blog post.'
Click Browse to select the video file from your computer that you'd like to upload. Note that Blogger accepts AVI, MPEG, QuickTime, Real and Windows Media files and that your video must be less than 100MB in size.
Before uploading your video, add a title in the 'Video Title' box and agree to the Terms and Conditions (you'll only have to do this the first time that you upload a video with Blogger). Then click UPLOAD VIDEO.
While your video uploads, you'll see a placeholder in the post editor showing where your video will appear. You'll also see a status message below the post editor letting you know that your upload is in progress. Depending on the size of your video, this usually takes about five minutes. When it is complete, your video will appear in the post editor.
Want to see this in action? Click the link to watch a video on how to add a video to your blog post:
Adding a video to your post

Read more...

Getting started with Blogger


Blogger offers an easy way to collaborate, discuss, or share your thoughts with others. This guide can help you familiarize yourself with the main features of Blogger and get started writing your own blog.
To start using Blogger, simply sign in with your Google Account. (If you use Gmail, Google Groups, or orkut, you already have an account.) If you don't have a Google Account yet, you can create one now.

Create a blog

To get started with Blogger, visit the Blogger homepage, enter your username and password, and click Sign in. Enter a display name and accept Blogger's Terms of Service. Then click the Create a Blog link and get started!
Pick a name and address (URL) for your blog. Then, choose your favorite template (this is how your blog will look when you publish it). Now get greative, add information to your personal profile, and customize how your blog looks, if you feel up to it. Start blogging now!

Read more...

Write your post

Once you've signed in to Blogger, you'll see your dashboard with your list of blogs. Here's what you need to do:

  1. Click the NEW POST button and enter anything you want to share with the world.
  2. Next, you'll see the Create New Post page. Start by giving your post a title (optional), then enter the post itself:
    Creating a new post
  3. When you're done, click the Preview link to make sure it's ready to go:
    Previewing a post
  4. Once you're satisfied with your post, click the Publish button. This will publish your new post.

Read more...

  © Free Blogger Templates Skyblue by Ourblogtemplates.com 2008

Back to TOP